Applicazione WPF CRUD che utilizza DataGrid, MVVM Pattern, Entity Framework e C#.NET
Ecco un esempio di progetto WPF CRUD (Create, Update and Delete) che usa il controllo DataGrid, ADO.NET Entity Framework 6.x, C#.NET e il modello architettonico Model–View–Viewmodel(MVVM). Questo post è stato basato su questo tutorial WPF CRUD con DataGrid, Entity Framework e C#.NET, tranne per il fatto che ora stiamo usando il framework MVVM. I passaggi seguenti sono piuttosto semplici e facili da seguire.
Io. Configurazione del progetto
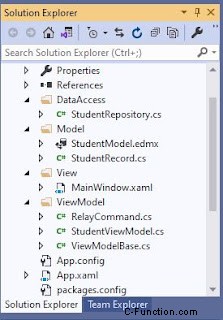
1. Aggiungi una tabella chiamata Studenti nel tuo database. Lo script completo si trova in questo post WPF CRUD con DataGrid, Entity Framework e C#.NET2. Creare un progetto WPF e aggiungere quattro cartelle denominate DataAccess, Model, View e ViewModel.
3. La struttura del tuo progetto potrebbe apparire simile con lo screenshot fornito di seguito.
II. Codifica della classe Model e Repository
1. All'interno della cartella Model, aggiungere un ADO.NET Entity Data Model che si connette alla tabella Students nel database. Da parte mia, l'ho chiamato StudentModel .2. Per il nome della stringa di connessione, l'ho modificato in StudentEntities .
3. Il prossimo passo è aggiungere un StudentRecord classe con proprietà corrispondenti alle colonne della tabella e una proprietà ObservableCollection utilizzata come origine elemento per DataGrid. Questa classe eredita il ViewModelBase classe aggiunta nella cartella ViewModel che sarà menzionata nella sezione Coding The ViewModel Classes in modo che esista un meccanismo nella gestione delle modifiche alle proprietà e delle notifiche dai controlli tramite l'associazione dati.
public class StudentRecord : ViewModelBase
{
	private int _id;
	public int Id
	{
		get
		{
			return _id;
		}
		set
		{
			_id = value;
			OnPropertyChanged("Id");
		}
	}

	private string _name;
	public string Name
	{
		get
		{
			return _name;
		}
		set
		{
			_name = value;
			OnPropertyChanged("Name");
		}
	}

	private int _age;
	public int Age
	{
		get
		{
			return _age;
		}
		set
		{
			_age = value;
			OnPropertyChanged("Age");
		}
	}

	private string _address;
	public string Address
	{
		get
		{
			return _address;
		}
		set
		{
			_address = value;
			OnPropertyChanged("Address");
		}
	}

	private string _contact;
	public string Contact
	{
		get
		{
			return _contact;
		}
		set
		{
			_contact = value;
			OnPropertyChanged("Contact");
		}
	}

	private ObservableCollection<StudentRecord> _studentRecords;
	public ObservableCollection<StudentRecord> StudentRecords
	{
		get
		{
			return _studentRecords;
		}
		set
		{
			_studentRecords = value;
			OnPropertyChanged("StudentRecords");
		}
	}

	private void StudentModels_CollectionChanged(object sender, NotifyCollectionChangedEventArgs e)
	{
		OnPropertyChanged("StudentRecords");
	}
}
4. Aggiungere una classe di repository all'interno della cartella DataAccess che esegue le operazioni CRUD verso il database. public class StudentRepository
{
private StudentEntities studentContext = null;
public StudentRepository()
{
studentContext = new StudentEntities();
}
public Student Get(int id)
{
return studentContext.Students.Find(id);
}
public List<Student> GetAll()
{
return studentContext.Students.ToList();
}
public void AddStudent(Student student)
{
if (student != null)
{
studentContext.Students.Add(student);
studentContext.SaveChanges();
}
}
public void UpdateStudent(Student student)
{
var studentFind = this.Get(student.ID);
if (studentFind != null)
{
studentFind.Name = student.Name;
studentFind.Contact = student.Contact;
studentFind.Age = student.Age;
studentFind.Address = student.Address;
studentContext.SaveChanges();
}
}
public void RemoveStudent(int id)
{
var studObj = studentContext.Students.Find(id);
if (studObj != null)
{
studentContext.Students.Remove(studObj);
studentContext.SaveChanges();
}
}
}
III. Codificare le classi ViewModel
1. Aggiungere una classe ViewModelBase che implementa l'interfaccia INofifyPropertyChanged. Questa interfaccia informa sostanzialmente i client di associazione che il valore di una proprietà è stato aggiornato. Questa classe è ereditata dal modello StudentRecord di cui le sue proprietà vengono utilizzate nell'associazione dati e necessitava di una sorta di notifica quando il valore di una proprietà è stato modificato.public class ViewModelBase : INotifyPropertyChanged
{
public event PropertyChangedEventHandler PropertyChanged;
protected void OnPropertyChanged(string propertyName)
{
if (PropertyChanged != null)
{
PropertyChanged(this, new PropertyChangedEventArgs(propertyName));
}
}
}
2. Successivamente è aggiungere una classe RelayCommand che implementa l'interfaccia ICommand. I comandi vengono utilizzati per gestire gli eventi in WPF per quanto riguarda il modello architettonico MVVM. L'unico scopo di un comando è di inoltrare o distribuire la sua funzionalità ad altri oggetti richiamando i delegati. Il valore restituito predefinito per un metodo CanExecute è true. Una buona spiegazione di ciò che una classe RelayCommand è spiegata in stackoverflow.com.public class RelayCommand : ICommand
{
private readonly Action<object> _execute;
private readonly Predicate<object> _canExecute;
public RelayCommand(Action<object> execute)
: this(execute, null)
{
}
public RelayCommand(Action<object> execute, Predicate<object> canExecute)
{
if (execute == null)
throw new ArgumentNullException("execute");
_execute = execute;
_canExecute = canExecute;
}
public bool CanExecute(object parameter)
{
return _canExecute == null ? true : _canExecute(parameter);
}
public event EventHandler CanExecuteChanged
{
add { CommandManager.RequerySuggested += value; }
remove { CommandManager.RequerySuggested -= value; }
}
public void Execute(object parameter)
{
_execute(parameter);
}
}
3. Infine, creare una classe ViewModel che esegua l'associazione dei comandi dei pulsanti che quindi chiama metodi specifici che gestiscono le operazioni CRUD e l'aggiornamento dei valori delle proprietà. Un esempio è il comando Save associato al pulsante Salva nella vista. Quando si fa clic sul pulsante di salvataggio, il comando di salvataggio esegue quindi il metodo SaveData() e salva le informazioni nel database, quindi ricarica tutto nell'oggetto Observable che è l'ItemSource di DataGrid. Una spiegazione dettagliata e lunga di ciò che fa MVVM è presentata qui App WPF con il modello di progettazione Model-View-ViewModel. La classe ViewModel può ancora essere rifattorizzato come inserire comandi ed entità in ciascuna classe diversa o giù di lì. Ma per questa demo, ho finito per mettere tutto qui. public class StudentViewModel
{
private ICommand _saveCommand;
private ICommand _resetCommand;
private ICommand _editCommand;
private ICommand _deleteCommand;
private StudentRepository _repository;
private Student _studentEntity = null;
public StudentRecord StudentRecord { get; set; }
public StudentEntities StudentEntities { get; set; }
public ICommand ResetCommand
{
get
{
if (_resetCommand == null)
_resetCommand = new RelayCommand(param => ResetData(), null);
return _resetCommand;
}
}
public ICommand SaveCommand
{
get
{
if (_saveCommand == null)
_saveCommand = new RelayCommand(param => SaveData(), null);
return _saveCommand;
}
}
public ICommand EditCommand
{
get
{
if (_editCommand == null)
_editCommand = new RelayCommand(param => EditData((int)param), null);
return _editCommand;
}
}
public ICommand DeleteCommand
{
get
{
if (_deleteCommand == null)
_deleteCommand = new RelayCommand(param => DeleteStudent((int)param), null);
return _deleteCommand;
}
}
public StudentViewModel()
{
_studentEntity = new Student();
_repository = new StudentRepository();
StudentRecord = new StudentRecord();
GetAll();
}
public void ResetData()
{
StudentRecord.Name = string.Empty;
StudentRecord.Id = 0;
StudentRecord.Address = string.Empty;
StudentRecord.Contact = string.Empty;
StudentRecord.Age = 0;
}
public void DeleteStudent(int id)
{
if (MessageBox.Show("Confirm delete of this record?", "Student", MessageBoxButton.YesNo)
== MessageBoxResult.Yes)
{
try
{
_repository.RemoveStudent(id);
MessageBox.Show("Record successfully deleted.");
}
catch (Exception ex)
{
MessageBox.Show("Error occured while saving. " + ex.InnerException);
}
finally
{
GetAll();
}
}
}
public void SaveData()
{
if (StudentRecord != null)
{
_studentEntity.Name = StudentRecord.Name;
_studentEntity.Age = StudentRecord.Age;
_studentEntity.Address = StudentRecord.Address;
_studentEntity.Contact = StudentRecord.Contact;
try
{
if (StudentRecord.Id <= 0)
{
_repository.AddStudent(_studentEntity);
MessageBox.Show("New record successfully saved.");
}
else
{
_studentEntity.ID = StudentRecord.Id;
_repository.UpdateStudent(_studentEntity);
MessageBox.Show("Record successfully updated.");
}
}
catch (Exception ex)
{
MessageBox.Show("Error occured while saving. " + ex.InnerException);
}
finally
{
GetAll();
ResetData();
}
}
}
public void EditData(int id)
{
var model = _repository.Get(id);
StudentRecord.Id = model.ID;
StudentRecord.Name = model.Name;
StudentRecord.Age = (int)model.Age;
StudentRecord.Address = model.Address;
StudentRecord.Contact = model.Contact;
}
public void GetAll()
{
StudentRecord.StudentRecords = new ObservableCollection<StudentRecord>();
_repository.GetAll().ForEach(data => StudentRecord.StudentRecords.Add(new StudentRecord()
{
Id = data.ID,
Name = data.Name,
Address = data.Address,
Age = Convert.ToInt32(data.Age),
Contact = data.Contact
}));
}
}
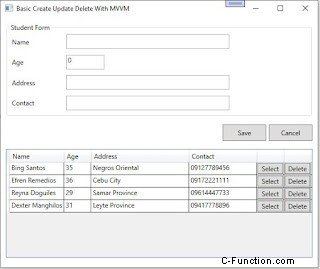
IV. Associazione dati e visualizzazione
1. Ultimo ma non meno importante è la vista. Sposta la pagina MainWindow nella cartella View del progetto. Nel metodo del costruttore, imposta la classe DataContext con la classe StudentViewModel. Puoi scegliere di impostare DataContext tramite XAML.public partial class MainWindow : Window
{
public MainWindow()
{
InitializeComponent();
this.DataContext = new StudentViewModel();
}
}
2. Successivamente è aggiungere diversi controlli come caselle di testo per accettare l'input, pulsanti per attivare eventi e il controllo DataGrid per mostrare l'intera informazione aggiornata dal database. Questi controlli sono stati incollati alla classe ViewModel tramite il Binding proprietà. I controlli di input sono raggruppati in un pannello GroupBox, mentre i pulsanti Salva e Ripristina si trovano all'interno del contenitore StackPanel. Il DataGrid si trova anche all'interno del contenitore StackPanel e ciascuno di questi contenitori è disposto orizzontalmente all'interno di un contenitore padre StackPanel.<Window x:Class="MVVMDemo.View.MainWindow"
xmlns="http://schemas.microsoft.com/winfx/2006/xaml/presentation"
xmlns:x="http://schemas.microsoft.com/winfx/2006/xaml"
xmlns:d="http://schemas.microsoft.com/expression/blend/2008"
xmlns:mc="http://schemas.openxmlformats.org/markup-compatibility/2006"
xmlns:local="clr-namespace:MVVMDemo.View"
mc:Ignorable="d"
Title="Basic Create Update Delete With MVVM"
Height="500" Width="600">
<StackPanel Orientation="Vertical">
<GroupBox Header="Student Form" Margin="10">
<Grid Height="150">
<Grid.RowDefinitions>
<RowDefinition Height="1*"/>
<RowDefinition Height="1*"/>
<RowDefinition Height="1*"/>
<RowDefinition Height="1*"/>
</Grid.RowDefinitions>
<Grid.ColumnDefinitions>
<ColumnDefinition Width="100"/>
<ColumnDefinition Width="*"/>
</Grid.ColumnDefinitions>
<Label Content="Name" HorizontalAlignment="Left"
VerticalContentAlignment="Center" Grid.Column="0" Grid.Row="0"/>
<TextBox Grid.Row="0" Grid.Column="1" x:Name="TextBoxName" Height="27"
Text="{Binding Path=StudentRecord.Name, Mode=TwoWay}" Margin="5" Width="300" HorizontalAlignment="Left"/>
<Label Content="Age" HorizontalAlignment="Left" VerticalContentAlignment="Center"
Grid.Row="1" Grid.Column="0"/>
<TextBox Grid.Row="1" Grid.Column="1" x:Name="TextBoxAge" Height="27"
Text="{Binding Path=StudentRecord.Age, Mode=TwoWay}" Margin="5" Width="70" HorizontalAlignment="Left"/>
<TextBlock Grid.Row="1" Grid.Column="1" x:Name="TextBlockId"
Visibility="Hidden" Text="{Binding Path=StudentRecord.Id, Mode=TwoWay}"/>
<Label Content="Address" HorizontalAlignment="Left" VerticalContentAlignment="Center"
Grid.Row="2" Grid.Column="0" />
<TextBox Grid.Row="2" Grid.Column="1" x:Name="TextBoxAddress" Height="27"
Text="{Binding Path=StudentRecord.Address, Mode=TwoWay}" Margin="5" Width="300" HorizontalAlignment="Left"/>
<Label Content="Contact" HorizontalAlignment="Left" VerticalContentAlignment="Center"
Grid.Row="3" Grid.Column="0" />
<TextBox Grid.Row="3" Grid.Column="1" x:Name="TextBoxContact" Height="27"
Text="{Binding Path=StudentRecord.Contact, Mode=TwoWay}" Margin="5" Width="300" HorizontalAlignment="Left"/>
</Grid>
</GroupBox>
<StackPanel Height="40" Orientation="Horizontal" HorizontalAlignment="Right">
<Button x:Name="ButtonSave" Content="Save" Height="30" Width="80"
Command="{Binding SaveCommand}"/>
<Button x:Name="ButtonCancel" Content="Cancel" Height="30" Width="80"
Command="{Binding ResetCommand}" Margin="5,0,10,0"/>
</StackPanel>
<StackPanel Height="210">
<DataGrid x:Name="DataGridStudents" AutoGenerateColumns="False"
ItemsSource="{Binding StudentRecord.StudentRecords}" CanUserAddRows="False" Height="200" Margin="10">
<DataGrid.Columns>
<DataGridTextColumn Header="Name" Binding="{Binding Path=Id}" Visibility="Hidden"/>
<DataGridTextColumn Header="Name" Binding="{Binding Path=Name}" Width="100" IsReadOnly="True"/>
<DataGridTextColumn Header="Age" Binding="{Binding Path=Age}" Width="50" IsReadOnly="True"/>
<DataGridTextColumn Header="Address" Binding="{Binding Path=Address}" Width="180" IsReadOnly="True"/>
<DataGridTextColumn Header="Contact" Binding="{Binding Path=Contact}" Width="125" IsReadOnly="True"/>
<DataGridTemplateColumn Width="50">
<DataGridTemplateColumn.CellTemplate>
<DataTemplate>
<Button Content="Select" x:Name="ButtonEdit" CommandParameter="{Binding Path=Id}"
Command="{Binding Path=DataContext.EditCommand,RelativeSource={RelativeSource FindAncestor,
AncestorType=Window}}"/>
</DataTemplate>
</DataGridTemplateColumn.CellTemplate>
</DataGridTemplateColumn>
<DataGridTemplateColumn Width="50">
<DataGridTemplateColumn.CellTemplate>
<DataTemplate>
<Button Content="Delete" x:Name="ButtonDelete" CommandParameter="{Binding Path=Id}"
Command="{Binding Path=DataContext.DeleteCommand, RelativeSource={RelativeSource FindAncestor,
AncestorType=Window}}"/>
</DataTemplate>
</DataGridTemplateColumn.CellTemplate>
</DataGridTemplateColumn>
</DataGrid.Columns>
</DataGrid>
</StackPanel>
</StackPanel>
</Window>
Uscita